随机城市白膜 · White Model · ▶ 在线运行案例
案例合集: 三维可视化功能案例(threehub.cn)
开源仓库github地址: https://github.com/z2586300277/three-cesium-examples
**400个案例代码: ** 网盘链接
你将学到什么
- OrbitControls 相机轨道交互
- 监听窗口
resize同步更新 camera 与 renderer
效果说明
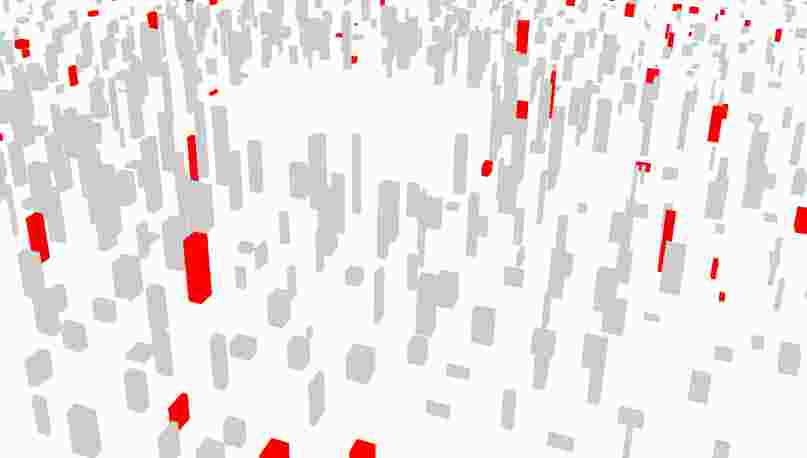
本案例演示 随机城市白膜 效果:生成仿真城市白膜;核心用到 OrbitControls。建议先打开文首在线案例查看动态画面,再对照下方源码逐步理解。
核心概念
- Scene / Camera / WebGLRenderer 构成最小渲染闭环;大场景可开
logarithmicDepthBuffer缓解 Z-fighting。 - OrbitControls 提供轨道旋转/缩放;开启
enableDamping后需在 animate 中controls.update()。 - 阅读下方完整源码时,建议从
init/load/animate三条主线入手,再深入 shader 与工具函数。
实现步骤
- 搭建灯光与环境(如有)
- requestAnimationFrame 循环 update + render
代码要点
import * as THREE from 'three';
import { OrbitControls } from "three/examples/jsm/Addons.js";
const DOM = document.getElementById('box')

var scene = new THREE.Scene();

var camera = new THREE.PerspectiveCamera(60, innerWidth / innerHeight);
camera.position.set(-1, 0.5, 1).setLength(75);

camera.lookAt(scene.position);

var renderer = new THREE.WebGLRenderer({ antialias: true });
renderer.setSize(innerWidth, innerHeight);
renderer.setAnimationLoop(animationLoop);
function animationLoop() {
    renderer.render(scene, camera);
}
DOM.appendChild(renderer.domElement);

window.addEventListener("resize", () => {
    camera.aspect = innerWidth / innerHeight;
    camera.updateProjectionMatrix();
    renderer.setSize(innerWidth, innerHeight);
});

var controls = new OrbitControls(camera, renderer.domElement);
controls.target.set(0, 12, 0);

controls.update();
controls.enableDamping = true;
controls.autoRotate = true;

var light = new THREE.DirectionalLight('white', 3);
light.position.set(1, 1, 1);
scene.add(light);
import { Mesh, MathUtils, PlaneGeometry, Color,BoxGeometry,MeshBasicMaterial } from 'three';


/**
 * 生成仿真城市白膜
 */
const buildingGeometry = new BoxGeometry(1, 1, 1);
buildingGeometry.translate(0, 0.5, 0); // 调整几何中心点
const buildingMaterial = new MeshBasicMaterial({ color: 0xcccccc });
function generateCityModel() {
    const citySize = 50; // 城市范围
    const spacing = 10; // 建筑间隔
    const maxDistance = citySize * spacing; // 最大影响范围
    const plane = new PlaneGeometry(maxDistance * 2, maxDistance * 2);
    plane.rotateX(-Math.PI / 2)
    scene.add(new Mesh(plane))
    for (let z = -citySize; z < citySize; z++) {
        for (let x = -citySize; x < citySize; x++) {
            // 跳过城市中心一定区域,避免过密
            if (Math.abs(x) < 5 && Math.abs(z) < 5) continue;

            // 计算建筑位置
            const positionX = x * spacing;
            const positionZ = z * spacing;
            const distanceFromCenter = Math.sqrt(positionX ** 2 + positionZ ** 2);

            // 根据距离中心的远近调整建筑高度和生成概率
            const distanceFactor = 1 - MathUtils.clamp(distanceFromCenter / maxDistance, 0, 1);
            const heightScale = Math.pow(distanceFactor, 4); // 高度衰减曲线

            if (Math.random() < distanceFactor) { // 随机生成的概率
                const building = new Mesh(buildingGeometry, buildingMaterial);

                // 设置建筑位置
                let offset = (Math.random() * 0.5 - 1) * spacing
                building.position.set(positionX + offset, 0, positionZ + offset);

                // 设置建筑缩放
                building.scale.set(
                    MathUtils.randInt(1, 4), // 宽度随机
                    1 + Math.floor(Math.random() * heightScale * 35), // 高度与距离中心相关
                    MathUtils.randInt(1, 4)  // 深度随机
                );
                // 随机红色
                if (Math.random() < 0.1) {
                    building.material = building.material.clone();
                    building.material.color = new Color('red');
                }
                scene.add(building);
            }
        }
    }
}

generateCityModel()
完整源码:GitHub
小结
- 本文提供 随机城市白膜 完整 Three.js 源码与在线 Demo,建议先运行案例再改 uniform/参数做二次实验
- 更多 Three.js 实战案例见 three-cesium-examples 合集 与 GitHub 开源仓库